- Click on MAIL in the top menu bar
- Next choose Add Mail Account
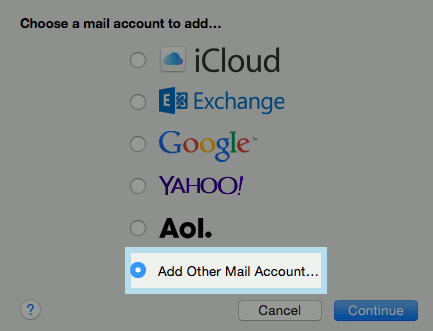
- Select Add Other Account followed by Continue
- Next add your Name, Full Email Address, and your Email Password

- Next you will want to fill in both Incoming and Outgoing Mail servers to "email.pictordesign.com" followed by clicking "Sign In"
- Account Type: - We suggest IMAP
- Mail Server: - email.pictordesign.com
- User Name: - Your user name is your full email address
- Password: - your email password


- Now that the account is added, we will edit the account.
- Click MAIL in the top menu bar
- Click PREFERENCES
- Click ACCOUNTS at the top of the new window
- Click your XMission email from the left hand side column listings
- Navigate to the ADVANCED tab
- Change the PORT to "993" with USE SSL checked
- Change AUTHENTICATION to "Password"

- Next we will edit the Outgoing Mail Server info. The default settings should be fine however you can check them by going to:
- Click MAIL in the top menu bar
- Click PREFERENCES
- Click ACCOUNTS at the top of the new window
- Click your Zimbra email from the left hand side column listings
- Click the UP AND DOWN ARROWS located next to the OUTGOING MAIL SERVER (SMTP)
- Click EDIT SMTP SERVER LIST

- Next you will fill in the Outgoing Mail Server info
- Click the ADVANCED tab in the newly opened window
- You may keep the server port at 587 with "use ssl" checked. However Pictor Design recommends you use port 465 with "use ssl" checked
- Make sure your User Name is correct in the User Name field. Your user name is your full email address
- Enter your email password in the password field
- Click Ok

- Your Zimbra email account has now been successfully added!
